Difference between revisions of "Managing your visualisation"
| (3 intermediate revisions by the same user not shown) | |||
| Line 7: | Line 7: | ||
== Amending your visualisation details == | == Amending your visualisation details == | ||
The 'Make Changes' button allows you to amend the title of your visualisation, the author(s), the description, the concept tags and its topic categories. You can also insert or alter the URL to the visualisation's own Wiki page and set the 'Beta' flag. Further descriptions of these fields can be found [[ | The 'Make Changes' button allows you to amend the title of your visualisation, the author(s), the description, the concept tags and its topic categories. You can also insert or alter the URL to the visualisation's own Wiki page and set the 'Beta' flag. Further descriptions of these fields can be found [[Uploading a new visualisation#Upload your files|here]]. | ||
Under the image of your visualisation, you can find its current [[Visualisation status|status]] as well as other details. Note that if your visualisation has been published, there will be a link to a GitHub repository: all visualisations are automatically pushed to a GitHub repo that holds the latest published version of the visualisation, so that future developers can easily access the code. | Under the image of your visualisation, you can find its current [[Visualisation status|status]] as well as other details. Note that if your visualisation has been published, there will be a link to a GitHub repository: all visualisations are automatically pushed to a GitHub repo that holds the latest published version of the visualisation, so that future developers can easily access the code. | ||
== | == Unpublishing your visualisation == | ||
When your visualisation is first approved, it will automatically be published on the 'Teach' environment of the website. However, if for any reason you do not wish it to appear on the 'Teach' environment, you can click the 'Unpublish' button. Your visualisation will remain on the system, but will not be shown on the 'Teach' environment. Note however that it can still be included in Collections on the 'Learn' environment; if it is part of a Collection, unpublishing will '''''not''''' remove it from this Collection. | When your visualisation is first approved, it will automatically be published on the 'Teach' environment of the website. However, if for any reason you do not wish it to appear on the 'Teach' environment, you can click the 'Unpublish' button. Your visualisation will remain on the system, but will not be shown on the 'Teach' environment. Note however that it can still be included in Collections on the 'Learn' environment; if it is part of a Collection, unpublishing will '''''not''''' remove it from this Collection. | ||
| Line 32: | Line 32: | ||
You can record any issues you find here yourself as well - this is a great way or keeping a record of fixes you still want to implement, or would like to pass on to future developers. | You can record any issues you find here yourself as well - this is a great way or keeping a record of fixes you still want to implement, or would like to pass on to future developers. | ||
Read more about recording issues [[Recording issues | Read more about recording issues [[Review#Recording issues|here]]. | ||
== Reviewers and developers == | == Reviewers and developers == | ||
| Line 49: | Line 49: | ||
* [[Managing your Collection]] | * [[Managing your Collection]] | ||
* [[Review|The review process]] | * [[Review|The review process]] | ||
[[Category:ImpVis Website Guidance]] | [[Category:ImpVis Website Guidance]] | ||
Latest revision as of 15:06, 30 September 2021
Once you have uploaded a visualisation, you can manage your visualisation via the 'My Visualisations' link in your 'MyVis' portal on the website.
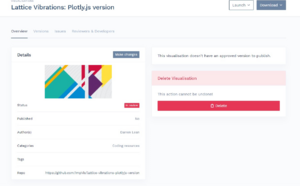
When you click on your visualisation, you will be presented with a visualisation management environment as shown in the screenshot to the right. This allows you to amend your visualisation details, publish/unpublish it (if approved), view its version history, view outstanding issues for your visualisation, specify reviewers and developers, or delete your visualisation altogether (this cannot be undone). You can also launch the visualisation or download the visualisation and source code zip files.
If your visualisation appears in any Collections, these will be listed at the bottom of the page. It is important to keep an eye on this when you consider implementing any changes: Collection owners may have good ideas for further improvements.
Amending your visualisation details
The 'Make Changes' button allows you to amend the title of your visualisation, the author(s), the description, the concept tags and its topic categories. You can also insert or alter the URL to the visualisation's own Wiki page and set the 'Beta' flag. Further descriptions of these fields can be found here.
Under the image of your visualisation, you can find its current status as well as other details. Note that if your visualisation has been published, there will be a link to a GitHub repository: all visualisations are automatically pushed to a GitHub repo that holds the latest published version of the visualisation, so that future developers can easily access the code.
Unpublishing your visualisation
When your visualisation is first approved, it will automatically be published on the 'Teach' environment of the website. However, if for any reason you do not wish it to appear on the 'Teach' environment, you can click the 'Unpublish' button. Your visualisation will remain on the system, but will not be shown on the 'Teach' environment. Note however that it can still be included in Collections on the 'Learn' environment; if it is part of a Collection, unpublishing will not remove it from this Collection.
If you wish to publish your visualisation again on the 'Teach' environment, simply press the 'Publish' button.
Visualisation version history
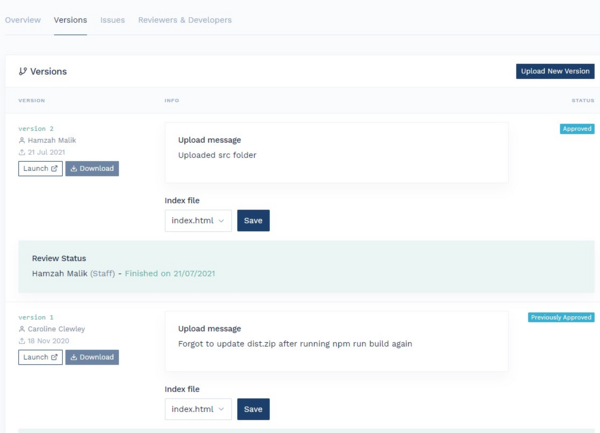
You can view the version history of your visualisation by clicking on the 'Versions' tab at the top of the page. You should now see a screen similar to the below:
Here you can see each version that has been uploaded for this visualisation. For each version, you can see who uploaded it, along with the upload message specifying the implemented changes for the new version. You can launch or download each different version of the visualisation. The status of each version is shown: only the latest 'approved' version will be published in the 'Teach' environment of the website (although previously approved versions may still show up in Collections in the 'Learn' environment - read more here).
In the green box, you can see which of the reviewers finished their reviews and which are still outstanding - if reviewers are unresponsive we suggest you remind them or assign a different reviewer as otherwise your visualisation will not be published on the website. For visualisations with multiple HTML files, the 'index' file (i.e. the file that will be shown when a user launches the visualisation) can be changed in the dropdown box.
You can also upload a new version of your visualisation on this page by clicking the 'Upload New Version' button at the top right.
Issues
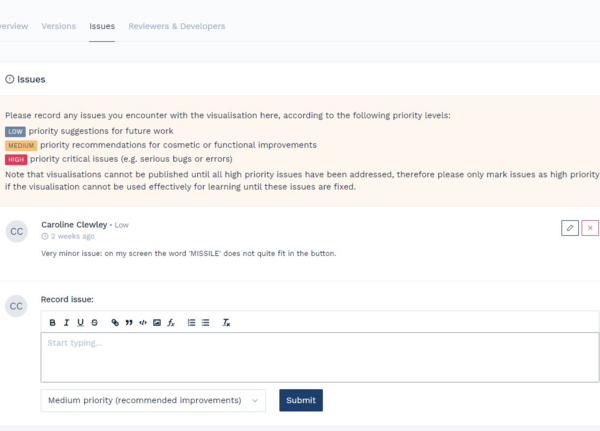
Clicking the 'Issues' list at the top of the page allows you to view outstanding issues and record new issues. You will see the following screen:
The issues list shows every issue recorded by developers, reviewers, or users of the visualisation. There are three different priorities: 'low', 'medium', and 'high'. Any issues of 'high' priority will stop the visualisation from being approved and published - these will need to be fixed plus a new version uploaded and reviewed, before the visualisation will appear on the 'Teach' environment of the website.
You can record any issues you find here yourself as well - this is a great way or keeping a record of fixes you still want to implement, or would like to pass on to future developers.
Read more about recording issues here.
Reviewers and developers
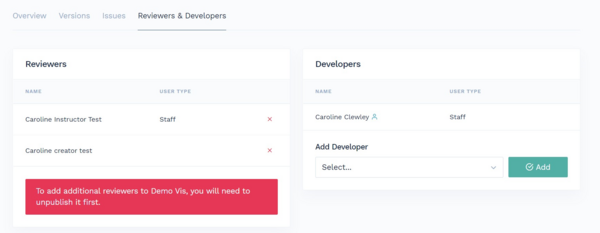
The reviewers & developers tab at the top of the page shows you who are currently specified as reviewers and developers for this visualisation. These people have permissions to view your visualisation even when it is not yet published on the website. If you click the tab, you will see the following screen:
People listed as reviewers are shown on the left, together with whether they are students or staff. This is relevant, because your visualisation will need to be reviewed by at least one staff member. You can remove reviewers here by pressing the red 'x' next to their name. You can also add new reviewers, but note that this will reduce the status of your visualisation to 'in review'. For this reason, you cannot add new reviewers to published visualisations (as in the screenshot above). You would first need to unpublish your visualisation, which should only be done with great caution as your visualisation may be in use in a Collection or by an instructor. If you think your visualisation needs additional review, a better option would be to upload a new version. This new version can then be reviewed whilst the old one remains published - only when the new version is approved will it supersede the old version.
If your visualisation is not yet published, you can add new reviewers from existing users or invite new reviewers by entering their email address. New reviewers are sent an automated email - you can add a personal message to this email if you wish by entering it in the 'Additional information for the reviewer' box (not shown in screenshot above).
Reviewers can view the details of your visualisation, launch it, and record issues; they cannot make any changes. Any ImpVis user can be selected as a reviewer. On the other hand, the developers listed on the right of your screen all have exactly the same permissions to the visualisation - each can access the full functionality of the visualisation management environment. You can add any user with creator permissions as a developer, but please do this with caution, bearing in mind the wide-ranging permissions (including deleting the visualisation!) they will be given. Removing a developer should only be done if you are sure they shouldn't be able to access the visualisation anymore, e.g. if they are no longer active within ImpVis.


