Difference between revisions of "Managing your Collection"
(Created page with "Once you have created a Collection, you can manage your Collection via the '[https://impvis.co.uk/code/collections My Collections]' link in your '[ht...") |
|||
| (2 intermediate revisions by the same user not shown) | |||
| Line 1: | Line 1: | ||
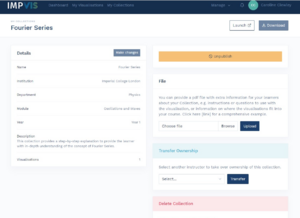
[[File:Manage your Collection.png|alt=Screenshot of the Collection management environment|thumb|Screenshot of the Collection management environment]] | |||
Once you have [[Creating a Collection|created a Collection]], you can manage your Collection via the '[https://impvis.co.uk/code/collections My Collections]' link in your '[https://impvis.co.uk/code/dashboard MyVis]' portal on the website. | Once you have [[Creating a Collection|created a Collection]], you can manage your Collection via the '[https://impvis.co.uk/code/collections My Collections]' link in your '[https://impvis.co.uk/code/dashboard MyVis]' portal on the website. | ||
When you click on your | When you click on your Collection, you will be presented with a Collection management environment as shown in the screenshot to the right. This allows you to amend your Collection details, publish/unpublish it to make it visible on the 'Learn' environment of the website, transfer ownership to another instructor or delete your Collection altogether (this cannot be undone). Lower down on the page you can also change the selection of visualisations included in the Collection and reorder the visualisations within your Collection. | ||
If your visualisation | Pressing the 'Launch' button at the top will show you what your Collection will look like. The 'Download' button allows you to download the entire Collection in a single zip file for offline use. | ||
== Amending the details of your Collection == | |||
The 'Make Changes' button allows you to amend the title of your Collection, the description, and the details of the module for which your Collection is intended (module title, year group, department, institution). | |||
== Publishing and unpublishing your visualisation == | |||
When you first create your Collection, it will not automatically show up on the 'Learn' environment. In order to make it visible to your learners, you will need to publish your Collection by pressing the green 'Publish' button. Once it is published, the button will change into a yellow 'Unpublish' button, which you can use to hide your Collection from users (i.e. it will not show up on the 'Learn' environment anymore). | |||
== Attach a pdf file == | |||
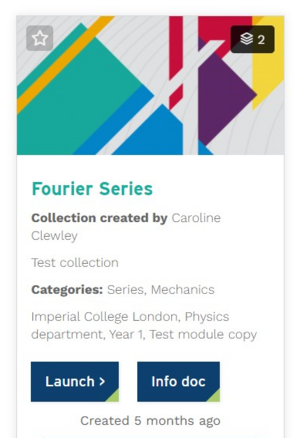
[[File:Collection with PDF file.png|alt=Collection with an associated PDF file on the 'Learn' environment - notice the 'Info Doc' button.|thumb|Collection with an associated PDF file on the 'Learn' environment - notice the 'Info Doc' button.]] | |||
If you wish to give your learners further information on how to use the Collection within your module, you can attach a PDF file. This could for example be a set of questions for your learners to explore with the visualisation, accompanying lecture notes, or a description of how the visualisations of the Collection fit into your module and how you wish them to interact with it. Collections that have a PDF file will show an 'Info Doc' button on the 'Learn' environment for users to view your file (see screenshot to the right). | |||
== Transferring ownership == | |||
A Collection can only be managed by a single person - if several instructors would like to use the same Collection in their own modules, they will need to copy the Collection as described [[Creating a Collection#Copy an existing Collection|here]]. However, you may wish to transfer the ownership of your Collection to a different instructor, for example when a new instructor takes over the module. In that case, select the new instructor from the dropdown list below the blue 'Transfer Ownership' caption. If your intended instructor does not appear on the list, it could be that (a) the instructor is not yet an ImpVis user or (b) they are an ImpVis user but do not yet have instructor (or creator) permissions. | |||
In the first case, please ask the instructor to sign up to the ImpVis website via [https://impvis.co.uk/signup this page]. Once they are registered, they can [[User roles|request instructor permissions]] via the '[https://impvis.co.uk/code/collections My Collections' link] in their '[https://impvis.co.uk/code/dashboard MyVis]' portal. When they have been granted permission, they will show up in the 'Transfer Ownership' dropdown list. | |||
== Changing your selection of visualisations in your Collection == | |||
You can change the order of the visualisations appearing in your Collection, remove visualisations, or add more visualisations to your Collection at the bottom of the page (see screenshot below). | |||
It is recommended that if you wish to add visualisations to your Collection, you first browse the available visualisations in the '[https://impvis.co.uk/Teach Teach]' environment. Here you can browse existing visualisations by topic category. When you find a visualisation that you want to add to your Collection, click the star icon on the visualisation to '[[Favourite visualisations and Collections|favourite]]' it, in a similar manner to [[Creating a Collection#Creating a Collection from visualisations on the Teach environment|this description]] for creating a new Collection. | |||
Returning to your Collection management environment, the lower part of the page looks like this:[[File:Visualisations for Collection.png|center|thumb|600x600px|Select one or more visualisations for your Collection. Note the star icon at the top right is selected to only show your favourite visualisations.]]Here you can view and change the selection of visualisations appearing in your Collection. By default, this shows all approved ImpVis visualisations you can choose from, which is a very long list! At the top, you can search for specific visualisations by name or keyword or filter by topic category. However, as you previously specified your favourite visualisations from the 'Teach' environment, the easiest thing to do is to select the button with the star icon at the top right (as shown in the screenshot above). Now only your favourite visualisations will show. | |||
You can also include visualisations that are still in review if you are a developer on those visualisations; however these will not show up in the Collection until they have been approved, so we recommend you only add approved visualisations to existing Collections. | |||
== Updates to visualisations within your Collection == | |||
As a Collection owner, you do not have any ownership of the visualisations within your Collection. If you have suggestions for improvements to these visualisations, you can do this by [[Giving user feedback on a visualisation|giving feedback]] on the visualisations. Alternatively, if you have a more large-scale improvement in mind, you can contact the visualisation developer(s) directly - their names are listed on the visualisations cards in the 'Teach' environment. | |||
Independent of this, developers may occasionally [[Uploading a new version of your visualisation|upload new versions]] of their visualisations. It is possible that new versions of visualisations are significantly different to older versions, which may not be well suited to your module. For this reason, '''''visualisations are not automatically updated in Collections.''''' | |||
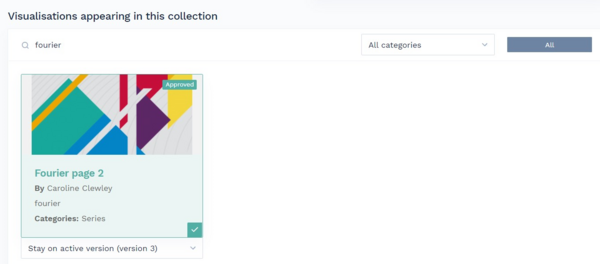
When a new version of a visualisation within your Collection is approved, you will get an email to state that a the visualisation has been updated, with a link to the visualisation and a link to your Collection(s) which include the relevant visualisation. Inspect the new version of the visualisation and decide whether you would like to either keep the old version in your Collection or update your Collection to include the new version of the visualisation. To do this, go to your Collection in the '[https://impvis.co.uk/code/collections My Collections]' environment, click on your Collection and scroll to the bottom of the page, where you can see the visualisations that are included in your Collection, as shown below (you may need to search by name for the visualisation that has been updated). | |||
[[File:Update visualisation in Collection.png|center|thumb|600x600px|A visualisation included in a Collection that has been updated. Choose to keep the old version of update your Collection to the new version of the visualisation.]] | |||
You can see a dropdown box has appeared below the visualisation that has been updated. Here you can choose to stay on the old version ('Stay on active version') or update to the new version ('Use latest approved version'). | |||
If you do not take any action, your Collection will keep the versions of the visualisations that were published when you first created the visualisation - updates to these visualisations will not be reflected in your Collection. | |||
[[Category:ImpVis Website Guidance]] | [[Category:ImpVis Website Guidance]] | ||
Latest revision as of 12:31, 1 October 2021
Once you have created a Collection, you can manage your Collection via the 'My Collections' link in your 'MyVis' portal on the website.
When you click on your Collection, you will be presented with a Collection management environment as shown in the screenshot to the right. This allows you to amend your Collection details, publish/unpublish it to make it visible on the 'Learn' environment of the website, transfer ownership to another instructor or delete your Collection altogether (this cannot be undone). Lower down on the page you can also change the selection of visualisations included in the Collection and reorder the visualisations within your Collection.
Pressing the 'Launch' button at the top will show you what your Collection will look like. The 'Download' button allows you to download the entire Collection in a single zip file for offline use.
Amending the details of your Collection
The 'Make Changes' button allows you to amend the title of your Collection, the description, and the details of the module for which your Collection is intended (module title, year group, department, institution).
Publishing and unpublishing your visualisation
When you first create your Collection, it will not automatically show up on the 'Learn' environment. In order to make it visible to your learners, you will need to publish your Collection by pressing the green 'Publish' button. Once it is published, the button will change into a yellow 'Unpublish' button, which you can use to hide your Collection from users (i.e. it will not show up on the 'Learn' environment anymore).
Attach a pdf file
If you wish to give your learners further information on how to use the Collection within your module, you can attach a PDF file. This could for example be a set of questions for your learners to explore with the visualisation, accompanying lecture notes, or a description of how the visualisations of the Collection fit into your module and how you wish them to interact with it. Collections that have a PDF file will show an 'Info Doc' button on the 'Learn' environment for users to view your file (see screenshot to the right).
Transferring ownership
A Collection can only be managed by a single person - if several instructors would like to use the same Collection in their own modules, they will need to copy the Collection as described here. However, you may wish to transfer the ownership of your Collection to a different instructor, for example when a new instructor takes over the module. In that case, select the new instructor from the dropdown list below the blue 'Transfer Ownership' caption. If your intended instructor does not appear on the list, it could be that (a) the instructor is not yet an ImpVis user or (b) they are an ImpVis user but do not yet have instructor (or creator) permissions.
In the first case, please ask the instructor to sign up to the ImpVis website via this page. Once they are registered, they can request instructor permissions via the 'My Collections' link in their 'MyVis' portal. When they have been granted permission, they will show up in the 'Transfer Ownership' dropdown list.
Changing your selection of visualisations in your Collection
You can change the order of the visualisations appearing in your Collection, remove visualisations, or add more visualisations to your Collection at the bottom of the page (see screenshot below).
It is recommended that if you wish to add visualisations to your Collection, you first browse the available visualisations in the 'Teach' environment. Here you can browse existing visualisations by topic category. When you find a visualisation that you want to add to your Collection, click the star icon on the visualisation to 'favourite' it, in a similar manner to this description for creating a new Collection.
Returning to your Collection management environment, the lower part of the page looks like this:
Here you can view and change the selection of visualisations appearing in your Collection. By default, this shows all approved ImpVis visualisations you can choose from, which is a very long list! At the top, you can search for specific visualisations by name or keyword or filter by topic category. However, as you previously specified your favourite visualisations from the 'Teach' environment, the easiest thing to do is to select the button with the star icon at the top right (as shown in the screenshot above). Now only your favourite visualisations will show.
You can also include visualisations that are still in review if you are a developer on those visualisations; however these will not show up in the Collection until they have been approved, so we recommend you only add approved visualisations to existing Collections.
Updates to visualisations within your Collection
As a Collection owner, you do not have any ownership of the visualisations within your Collection. If you have suggestions for improvements to these visualisations, you can do this by giving feedback on the visualisations. Alternatively, if you have a more large-scale improvement in mind, you can contact the visualisation developer(s) directly - their names are listed on the visualisations cards in the 'Teach' environment.
Independent of this, developers may occasionally upload new versions of their visualisations. It is possible that new versions of visualisations are significantly different to older versions, which may not be well suited to your module. For this reason, visualisations are not automatically updated in Collections.
When a new version of a visualisation within your Collection is approved, you will get an email to state that a the visualisation has been updated, with a link to the visualisation and a link to your Collection(s) which include the relevant visualisation. Inspect the new version of the visualisation and decide whether you would like to either keep the old version in your Collection or update your Collection to include the new version of the visualisation. To do this, go to your Collection in the 'My Collections' environment, click on your Collection and scroll to the bottom of the page, where you can see the visualisations that are included in your Collection, as shown below (you may need to search by name for the visualisation that has been updated).
You can see a dropdown box has appeared below the visualisation that has been updated. Here you can choose to stay on the old version ('Stay on active version') or update to the new version ('Use latest approved version').
If you do not take any action, your Collection will keep the versions of the visualisations that were published when you first created the visualisation - updates to these visualisations will not be reflected in your Collection.


