Difference between revisions of "Uploading a new version of your visualisation"
(Created page with "sdf") |
|||
| (3 intermediate revisions by the same user not shown) | |||
| Line 1: | Line 1: | ||
After first [[Uploading a new visualisation|uploading your visualisation]] and the [[review]] process, it is likely you will want to make some improvements and upload a new version of your visualisation. | |||
The [https://impvis.co.uk ImpVis website] operates a versioning system that allows you to upload new versions without affecting any previously-approved versions published on the website. Only when the new version has been reviewed and approved, will it supersede the previous version on the '[https://impvis.co.uk/teach Teach]' environment. New versions do not automatically supersede previous versions in Collections on the '[https://impvis.co.uk/learn Learn]' environment. | |||
== How to upload a new version == | |||
First off, find your visualisation via the '[https://impvis.co.uk/code/visualisations My Visualisations]' link in your '[https://impvis.co.uk/code/dashboard MyVis]' portal on the website. Click on the 'View' button of your visualisation - this will take you to the visualisation management environment (described [[Managing your visualisation|here]]). Next, click on the 'Versions' tab; you will now see a screen similar to the screenshot below. | |||
[[File:Version history.png|alt='Versions' tab in the visualisation management environment.|center|thumb|600x600px|'Versions' tab in the visualisation management environment.]] | |||
This is the [[Managing your visualisation#Visualisation version history|version history]] of your visualisation - in the example of the screenshot, two previous versions have been uploaded. | |||
To upload a new version, click on the blue button 'Upload New Version' at the top right. You will now see the following: | |||
[[File:Upload new version.png|center|frame|Window where you can upload a new version of your visualisation]] | |||
You can now upload your new visualisation zip file and source code zip file (see [[Uploading a new visualisation#How to prepare your files|here]] for a description of these zip files). Below the upload input boxes, there is a caption 'Issues addressed'. Here are listed all the outstanding issues recorded for the visualisation. If your new version addresses any of these issues, click the relevant tickbox(es) to indicate these have been resolved. | |||
Finally, write a short message describing any changes in this version, e.g. 'addressed issues as indicated' or 'fixed typos and added a graphic of X'. | |||
Press the 'save' button and your new version will be uploaded. | |||
== After uploading the new version == | |||
In the version history, you will now see your latest version, along with your upload message and any issues your latest version addresses. The [[Visualisation status|status]] of the new version will be 'in review'. Your visualisation's reviewers will have been sent an email, including your upload message, asking them to review the latest version. You can monitor whether they have finished their review in the green box below the latest version. | |||
If there was a previous version of the visualisation published on the website, this will remain the version users will access via the 'Teach' environment, until all your reviewers have finished their review of the latest version and there are no high-priority issues recorded. Once this happens, the new version will automatically be published and replace the previously published version on the 'Teach' environment. Because of this, you do not need to worry that you accidentally 'break' the visualisation that is published on the website by uploading a faulty new version. | |||
If you would like to change the reviewers for your new version, go to the '[[Managing your visualisation#Reviewers and developers|Reviewers & Developers]]' tab of the visualisation management environment. You can remove and add new reviewers here. | |||
== Versioning of visualisations in Collections == | |||
As described above, when your latest version has been approved it will automatically replace the previous version on the 'Teach' environment. However, your previous version may also have been included in Collections (by you or others) in the 'Learn' environment. What happens to these Collections when a visualisation is updated? | |||
It is possible that new versions of visualisations are significantly different to older versions, which may be well suited to one module but diverge from the visualisation's use in a different module. For this reason, '''''visualisations are not automatically updated in Collections.''''' | |||
When a new version is approved of a visualisation in a Collection, the Collection owner will receive an email stating that a new version is available. They can then choose to either ignore the new version, thereby keeping their Collection exactly the same, or to update to the latest version of the visualisation. Read about how this works [[Managing your Collection#Updates to visualisations within your Collection|here]]. | |||
As a visualisation developer, you can rest assured that your latest upload will not affect Collections unintentionally. | |||
[[Category:ImpVis Website Guidance]] | |||
Latest revision as of 13:14, 30 September 2021
After first uploading your visualisation and the review process, it is likely you will want to make some improvements and upload a new version of your visualisation.
The ImpVis website operates a versioning system that allows you to upload new versions without affecting any previously-approved versions published on the website. Only when the new version has been reviewed and approved, will it supersede the previous version on the 'Teach' environment. New versions do not automatically supersede previous versions in Collections on the 'Learn' environment.
How to upload a new version
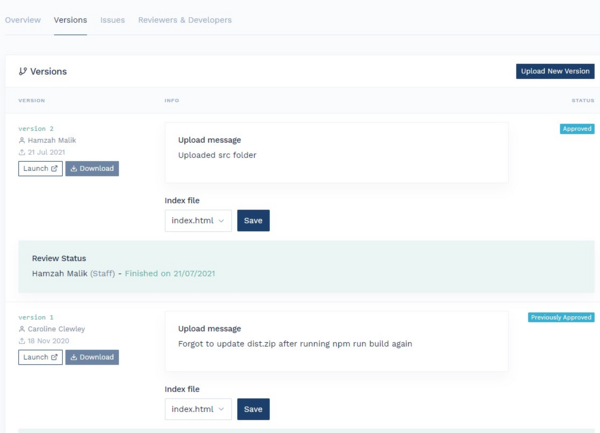
First off, find your visualisation via the 'My Visualisations' link in your 'MyVis' portal on the website. Click on the 'View' button of your visualisation - this will take you to the visualisation management environment (described here). Next, click on the 'Versions' tab; you will now see a screen similar to the screenshot below.
This is the version history of your visualisation - in the example of the screenshot, two previous versions have been uploaded.
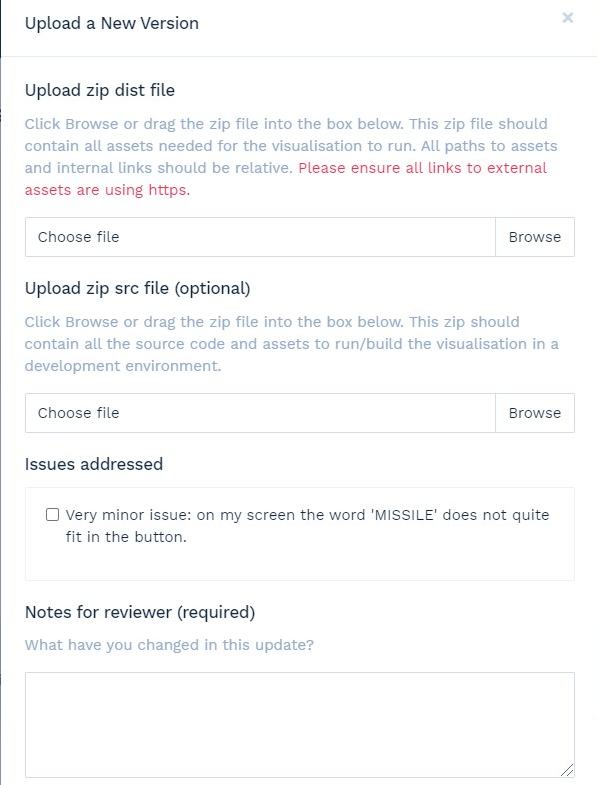
To upload a new version, click on the blue button 'Upload New Version' at the top right. You will now see the following:
You can now upload your new visualisation zip file and source code zip file (see here for a description of these zip files). Below the upload input boxes, there is a caption 'Issues addressed'. Here are listed all the outstanding issues recorded for the visualisation. If your new version addresses any of these issues, click the relevant tickbox(es) to indicate these have been resolved.
Finally, write a short message describing any changes in this version, e.g. 'addressed issues as indicated' or 'fixed typos and added a graphic of X'.
Press the 'save' button and your new version will be uploaded.
After uploading the new version
In the version history, you will now see your latest version, along with your upload message and any issues your latest version addresses. The status of the new version will be 'in review'. Your visualisation's reviewers will have been sent an email, including your upload message, asking them to review the latest version. You can monitor whether they have finished their review in the green box below the latest version.
If there was a previous version of the visualisation published on the website, this will remain the version users will access via the 'Teach' environment, until all your reviewers have finished their review of the latest version and there are no high-priority issues recorded. Once this happens, the new version will automatically be published and replace the previously published version on the 'Teach' environment. Because of this, you do not need to worry that you accidentally 'break' the visualisation that is published on the website by uploading a faulty new version.
If you would like to change the reviewers for your new version, go to the 'Reviewers & Developers' tab of the visualisation management environment. You can remove and add new reviewers here.
Versioning of visualisations in Collections
As described above, when your latest version has been approved it will automatically replace the previous version on the 'Teach' environment. However, your previous version may also have been included in Collections (by you or others) in the 'Learn' environment. What happens to these Collections when a visualisation is updated?
It is possible that new versions of visualisations are significantly different to older versions, which may be well suited to one module but diverge from the visualisation's use in a different module. For this reason, visualisations are not automatically updated in Collections.
When a new version is approved of a visualisation in a Collection, the Collection owner will receive an email stating that a new version is available. They can then choose to either ignore the new version, thereby keeping their Collection exactly the same, or to update to the latest version of the visualisation. Read about how this works here.
As a visualisation developer, you can rest assured that your latest upload will not affect Collections unintentionally.

