Difference between revisions of "Creating a Collection"
| Line 70: | Line 70: | ||
Note that at this point, your Collection does not yet show up on the 'Learn' environment of the website. When you are ready for it to do so, press the green 'Publish' button. Your Collection is now live on the 'Learn' environment and listed under your module! | Note that at this point, your Collection does not yet show up on the 'Learn' environment of the website. When you are ready for it to do so, press the green 'Publish' button. Your Collection is now live on the 'Learn' environment and listed under your module! | ||
When the Collection is completely ready, it is highly recommended you | When the Collection is completely ready, it is highly recommended you [[Managing your Collection#Transferring ownership|transfer ownership]] of the Collection to the instructor of the module. This means they can now [[Managing your Collection|manage the Collection]] as they see fit (e.g. add further visualisations, upload an accompanying PDF file, change the description etc). The instructor will need to have instructor or creator permissions on the website - if they do not show up on the list to transfer ownership it means they don't have the relevant permissions. In that case, ask them to sign up to the website if needed and [[User roles|request instructor permissions]], or contact one of the superadmins (e.g. Caroline Clewley) to give them instructor permissions directly! | ||
== Further reading == | == Further reading == | ||
Revision as of 13:00, 30 September 2021
Collections link visualisations to specific modules. They are shown in the 'Learn' environment of the website: this is where learners can easily find those visualisations that are relevant to the modules they are taking.
A Collection can exist of one or more visualisations. Each individual visualisation within a Collection is called a visualisation page - pages can be designed together and thereby intended to be collated in a Collection from the start, or they can be individual visualisations you have chosen from the 'Teach' environment.
A module can have as many Collections associated with it as needed. We therefore recommend to group together visualisations with logical links within a single Collection; if you wish to use other visualisations in your module as well you can create more Collections for these, or in fact only have single-visualisation Collections if none of the visualisations link together logically.
There are several ways of creating Collections. Below we give detailed instructions of each of these.
Note that to create a Collection, you will need to have either instructor or creator permissions. This is because we do not review Collections before publication and therefore we need to ensure that people who can publish Collections are genuine users. Read here about what the instructor and creator roles are and how to request the relevant permission.
Copy an existing Collection
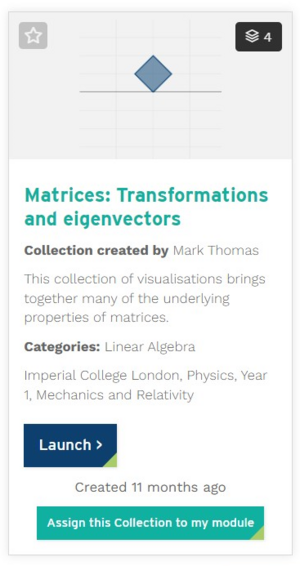
Log in to the ImpVis website and go to the 'Learn' environment. Here you can browse existing Collections by topic category or by module / department / year group. If you find an existing Collection that would be suitable for your own module, click the green button 'Assign this Collection to my module', as shown in the screenshot to the right. Note that if you are not logged in to the website, this button will not appear.
If you do not yet have instructor or creator permissions, you will now be directed to a screen where you can request permission. You will receive an email when you have been given permission - you can now once again browse to the relevant Collection and click the green button.
When you have the relevant permissions and click the green button, the Collection will be copied to your account. Note: this is now a stand-alone version of the Collection so any changes you make will not affect the original Collection. A window will pop up asking you to enter the details of the module you want to assign the Collection to. The 'name' and 'description' fields will be pre-filled as specified by the original Collection - you can keep these as they are or change them as you see fit. Make sure to enter your module, department, institution, and intended year group so that your learners will be able to find your Collection easily.
Once you press 'save', you will find yourself in the Collection management environment, where you can make further edits to your Collection.
Note that at this point, your Collection does not yet show up on the 'Learn' environment of the website. When you are ready for it to do so, press the green 'Publish' button. Your Collection is now live on the 'Learn' environment and listed under your module!
Creating a Collection from scratch
You can create a brand new Collection from scratch. There are usually two scenarios for this:
- You are an instructor of a module and would like to use existing visualisations from the 'Teach' environment in your module.
- You are a visualisation developer who has uploaded a single or multi-page visualisation and would like this to show up in the 'Learn' environment.
Below we detail the process we advise for each of these scenarios.
Creating a Collection from visualisations on the Teach environment
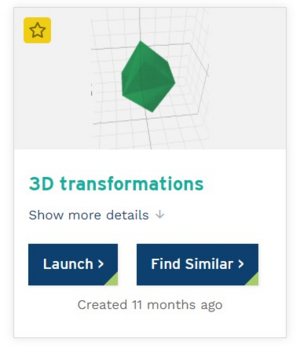
Log in to the ImpVis website and go to the 'Teach' environment. Here you can browse existing visualisations by topic category. When you find a visualisation that you want to use in your module, click the star icon on the visualisation to 'favourite' it - see screenshot to the right (if you are not logged in to the website, you will now be prompted to log in - enter your details and go back to the Teach environment to favourite your visualisation again).
Once you have picked all your favourite visualisations for your module, go to 'My Collections' in the 'MyVis' portal. If you do not yet have instructor or creator permissions, you will now be directed to a screen where you can request permission. You will receive an email when you have been given permission, now browse back to 'My Collections'.
Once you are in 'My Collections', click the blue button 'Create New' at the top right.
You now need to fill in the Collection name, description, and further details. Make sure you enter module, department, institution, and intended year group (where available) so that your learners will be able to find your Collection easily.
If you wish, you can choose to upload a pdf file with your Collection for your learners. This could for example be a set of questions to accompany the Collection, a description of how to use the Collection in your module, or accompanying lecture notes.
Finally, at the bottom of the page you are asked to select the visualisation(s) you would like to appear in this Collection. This looks as follows:
By default, this shows all approved ImpVis visualisations, which is a very long list! At the top, you can search for specific visualisations by name or keyword or filter by topic category. However, as you previously specified your favourite visualisations from the 'Teach' environment, the easiest thing to do is to select the button with the star icon at the top right (as shown in the screenshot above). Now only your favourite visualisations will show.
At this point, decide which of your favourite visualisations you would like in this Collection. Are they all logically linked and therefore belong in a Collection together? Or would you like to create several Collections of one or more visualisations? Click the ones you would like to appear in this Collection.
When you select the visualisations for your Collection, a list appears in which you can reorder the visualisations.
Finally, press the 'Create' button at the bottom. You will now find yourself in the Collection management environment, where you can make further edits to your Collection.
Note that at this point, your Collection does not yet show up on the 'Learn' environment of the website. When you are ready for it to do so, press the green 'Publish' button. Your Collection is now live on the 'Learn' environment and listed under your module!
Creating a Collection from visualisations you have previously uploaded
If you are a visualisation developer, you should upload your visualisations when they are completed. The next thing you want to do is ensure the learners for which this visualisation is intended can easily find the visualisation by creating a Collection for the 'Learn' environment. If you created a multi-page visualisation, each of these pages will be a separate visualisation on the website (each shows up as an individual visualisation on the 'Teach' environment). These pages will be collated once you create the Collection.
If you are a student developer, make sure at this point you have spoken to your staff partner and discussed the details of your Collection!
To create a Collection go to 'My Collections' in the 'MyVis' portal. Once you are in 'My Collections', click the blue button 'Create New' at the top right. You now need to fill in the Collection name, description, and further details. Make sure you enter module, department, institution, and intended year group (where available) so that your learners will be able to find your Collection easily.
If you wish, you can choose to upload a pdf file with your Collection for your learners. This could for example be a set of questions to accompany the Collection, a description of how to use the Collection in your module, or accompanying lecture notes.
Finally, at the bottom of the page you are asked to select the visualisation(s) you would like to appear in this Collection. This looks as follows:
By default, this shows all approved ImpVis visualisations, which is a very long list! At the top, you can search for specific visualisations by name or keyword or filter by topic category. However, since you wish to collate your own visualisations in a Collection, the easiest thing to do is to click the 'Own Only' button. Now only your own visualisations will show. Click the visualisation(s) you would like to appear in this Collection (remember, even single-page visualisations should be made into Collections - they can become a single-page Collection if there are no other logically linked visualisations to be included). When you select the visualisations for your Collection, a list appears in which you can reorder the visualisations.
Finally, press the 'Create' button at the bottom. You will now find yourself in the Collection management environment, where you can make further edits to your Collection.
Note that at this point, your Collection does not yet show up on the 'Learn' environment of the website. When you are ready for it to do so, press the green 'Publish' button. Your Collection is now live on the 'Learn' environment and listed under your module!
When the Collection is completely ready, it is highly recommended you transfer ownership of the Collection to the instructor of the module. This means they can now manage the Collection as they see fit (e.g. add further visualisations, upload an accompanying PDF file, change the description etc). The instructor will need to have instructor or creator permissions on the website - if they do not show up on the list to transfer ownership it means they don't have the relevant permissions. In that case, ask them to sign up to the website if needed and request instructor permissions, or contact one of the superadmins (e.g. Caroline Clewley) to give them instructor permissions directly!


