Module Timetable
This timetable is intended as a guide only to help you understand the structure of the course and the progress you should be making by different points. Each week includes a description of the timetabled session activities, the intended learning outcomes for that session, the asynchronous work for you to complete in between the sessions and the recommended progress status of your project. Note that we will adapt to the cohort's needs throughout the module, which means the schedule may change accordingly.
Week 1: Introduction to Course
Description
This week we will discuss the aims of the module and how the module will run. We will also take time to get to know each other and explore the platforms we will be using throughout the module. Finally, we will think about how we learn abstract concepts in STEMM and what role visualisation can play to aid understanding.
Intended learning outcomes
By the end of this session, you will be able to:
- navigate the module platforms and find relevant information;
- strike up a conversation with your peers and the module team;
- describe the ImpVis project and how this module fits into the overall project;
- discuss how students learn abstract concepts in STEMM and how visualisations can help students gain a deeper understanding.
Asynchronous work after the session
- Fill out a short form to help us assign you to a project group.
- Familiarise yourself with the portfolio template and fill out the reflective questions for week 1.
Week 2: Project Introduction
Description
This week you will find out your project and start working together with your project team. We will also have a guest talk by Dr Freddie Page about his own experiences designing & developing interactive visualisations. We will start thinking about what we think is important for a 'good' design of an interactive visualisation.
Intended learning outcomes
By the end of this session, you will be able to:
- explain what the topic is of your project and identify your project team partners;
- start applying the principles of working in partnership in your team work;
- outline the design & development process of an interactive visualisation for education;
- give a rudimentary opinion on what is important for the design of an effective visualisation.
Asynchronous work after the session
- Meet your staff partner to discuss your project and decide on how you will work together.
- Research your project topic so you can explain it to your peers.
- Insert (at least) one education resource that you found useful for understanding your project topic into your portfolio.
Recommended project progress
By the end of session 2, aim to:
- know what your project topic is and who your project (student) partners are,
- have signed up to your project on the ImpVis website (Code environment).
Before the start of session 3, aim to:
- have inserted your name on your project's Wiki page as a contributor and familiarised yourself with the Wiki.
- understand enough of your project topic so you can explain it to your peers.
Week 3: Educational Design
Description
This week we will have a guest talk by Dr Juan Nunez, who is an instructional designer in Imperial's Interdisciplinary Ed Tech Lab team. We will discuss which educational principles should be foremost in our mind when designing educational learning tools and attempt to apply these to our own projects.
Intended learning outcomes
By the end of this session, you will be able to:
- explain the most important educational principles underpinning our visualisation designs;
- evaluate and update the intended learning outcomes of your visualisation project;
- propose a way to create a scaffolded learning journey, tailored to your visualisation's learners' needs.
Asynchronous work after the session
- Meet with your staff partner and update your project's learning outcomes, based on what you have learned in session 3.
- Explore two given examples of visualisations and identify the educational principles underpinning its design - note these down in your portfolio.
Recommended project progress
By the end of session 3, aim to:
- have evaluated the existing aim & learning outcomes of your project and decided on whether any improvements are needed;
- have a rudimentary idea of how the visualisation's learning journey may be scaffolded.
Before the start of session 4, aim to:
- have updated the aim & learning outcomes of your project on your Wiki page & project Miro board;
- have collated your ideas on how to scaffold the learning journey on your project Miro board.
Week 4: Graphical Design
Description
This week we will have a guest talk by a graphic designer, explaining the principles of good graphic design. We will also discuss how this applies to your project and what graphical elements you may want to include in your visualisation.
Intended learning outcomes
By the end of this session, you will be able to:
- explain the most essential graphic design principles underpinning our visualisation designs;
- propose suitable graphical elements for your visualisation design;
Asynchronous work after the session
- Meet with your staff partner and discuss the graphical elements that could be included in your project, based on what you have learned in session 4.
- Find one example of 'good' graphic design (in your opinion) and one example of 'poor' graphic design (in your opinion) - insert and explain these in your portfolio.
Recommended project progress
By the end of session 4, aim to:
- have a range of ideas for graphical elements and 'graphical do's & don'ts' for your visualisation.
Before the start of session 5, aim to:
- have collated the most promising ideas for graphical elements + do's & don'ts on you project Miro board.
Week 5: Interaction Design
Description
This week we will hear from Prof Bob Spence about the fundamentals of human-computer interaction design. We will also experiment with different interactive components that currently are offered in the ImpVis template and discuss what interactive elements could be included in our visualisation designs.
Intended learning outcomes
By the end of this session, you will be able to:
- explain the most fundamental human-computer interaction design principles underpinning our visualisation designs;
- propose suitable interactive elements for your visualisation design;
Asynchronous work after the session
- Meet with your staff partner and discuss the interactive elements that could be included in your project, based on what you have learned in session 5.
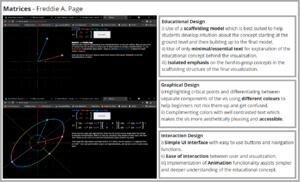
- Choose an interactive visualisation for education and critique it with respect to its education, graphic and interaction design (see example to the right). Insert this into your portfolio.
Recommended project progress
By the end of session 5, aim to:
- have a range of ideas for interactive elements and 'interaction do's & don'ts' for your visualisation.
Before the start of session 6, aim to:
- have collated the most promising ideas for interactive elements + do's & don'ts on you project Miro board.
Week 6: Project work - defining individual responsibilities
Description
This week we will start the visualisation design project work in earnest. We will finalise our thoughts on what makes a 'good' design of an interactive visualisation for education and formulate these, as a cohort, as the assessment criteria for our designs. Each project team will then decide on what needs to be done in order to create a 'good' design (according to these criteria). This will lead to a 'task tree'. Following on from this, you will complete a 'skills matrix' with your team in order to assign responsibilities to each project partner. Based on these responsibilities, you will define your own personal learning goals. This will form the basis of how you will work together as a team.
Intended learning outcomes
By the end of this session, you will be able to:
- describe what in our collective opinion constitute the principles of 'good' design of interactive visualisations for education;
- explain what will need to be done for your project to be successful and describe each project partner's responsibilities and relative expertise, including your own;
- identify what you are aiming to learn from your personal contribution to and participation in this visualisation project over the coming weeks.
Asynchronous work after the session
- Meet with your staff partner to discuss progress on the project.
- Carry out independent research as decided within your project team.
- Submit questions that you now have based on your research for discussion with other project teams.
Recommended project progress
By the end of session 6, aim to:
- have a completed task tree and skills matrix, with individual responsibilities assigned to each project partner - ensure these are visible on your project Miro board.
- have identified your personal learning goals and inserted these in your portfolio.
Before the start of session 7, aim to:
- have completed your first tasks and carried out some independent research
- have a range of individual ideas for components or contents for your visualisation - these do not yet need to be synthesised into a single design.
Week 7: Project work - supporting each other's progress
Description
This week is dedicated to discussing your progress with your project team as well as with peers from other project teams. You will spend about half the session with people from other project teams who are trying to find answers to similar questions as yourself, so you can share findings, tips and expertise. The other half will be with your project team in order to debrief each other on the progress you've made and synthesise your ideas into one coherent design idea.
Intended learning outcomes
By the end of this session, you will be able to:
- communicate findings and ideas with others who have a similar interest;
- evaluate input from others in order to help them improve their ideas as well as improve your own ideas;
- collaborate within your project team to combine different perspectives and findings into an effective, coherent design.
Asynchronous work after the session
- Continue independent research and work on your project, based on progress made during the session.
- Meet with your staff partner to discuss progress.
Recommended project status
By the end of session 7, aim to:
- have a detailed, synthesised idea of how your visualisation will look, what components it will include and what text content it will feature, all presented in a rough format;
- have added information into your Wiki page detailing design decisions and their rationale (i.e. why have you chosen to do it this way?).
Before the start of session 8, aim to:
- have an updated Wiki project page with further individual research findings;
- have prepared individually improved components of the visualisation design, presented in a better format.
Week 8: Project work - finalising your draft design
Description
This week you and your project team will finalise your project design draft. The entire session will be dedicated to project work, either in your own project team or comparing notes and discussing feedback with other project teams.
Intended learning outcomes
By the end of this session, you will be able to:
- Agree on a fully worked-out and synthesised design with your project partners.
Asynchronous work
- Meet with your staff partner to discuss the progress of your design.
- By Wednesday end of day: submit fully worked-out draft design with justifications on Wiki project page.
- From Thursday: review two other designs and fill in feedback template.
Recommended project status
By the end of session 8, aim to:
- have a synthesised, mostly complete visualisation design that is well presented;
- have a clear plan of / template for your submission format (e.g. a Miro board dedicated to the design draft with a clear structure).
By the submission deadline, aim to:
- have an up-to-date Wiki project page with your group's progress a nd design choices, which is mostly complete;
- have your design ready in your submission format, graphics presented to whatever standard is possible with the timeframe and resources (taking into account your project team's skills and software used).
Week 9: Review session
Description
This session we will undertake a formal review session, where each project team will give specific feedback to two other project teams. The feedback will be prioritised as follows: red - critical issues to be fixed in order to meet the assessment criteria; orange - recommended improvements to make the design better; blue - possible suggestions / inspiration for further work; green - exemplary features in the design that others should implement too.
Following the review, you will discuss the feedback given and received in your project team and decide on final improvements to make to your design before the final submission.
Intended learning outcomes
By the end of this session, you will be able to:
- evaluate other teams' designs in order to identify points for improvement as well as exemplary features you can incorporate in your own design;
- communicate feedback to other teams with a clear prioritisation in a constructive manner;
- reflect upon feedback received and agree within your project team whether and how to act upon this feedback in order to improve your design.
Asynchronous work
- Implement the final improvements to your design, as agreed with your team during the session.
- Meet with your staff partner in order to all agree on the final design;
- Finalise your submission for the design exhibition, including visual design representation as well as fully worked-out Wiki project page with design justification and ideas for further work.
Recommended project status
By the end of session 9 you should aim to:
- have a clearly worked out list of actions to undertake to finalise your submission;
- have agreed exactly who will take responsibility for which actions.
Before session 10 you should aim to:
- have agreed your design with all project partners and indicate this on your project management environment on the ImpVis website;
- have submitted your design exhibition submission, together with a fully worked-out Wiki project page with design justification and ideas for further work.
Week 10: Design exhibition
This week all project teams will showcase their designs to each other as well as external people who will assess the designs according to the assessment criteria created by the whole module cohort. Afterwards, we will reflect upon what we have learnt throughout the module and discuss how you (or others) can take your design forwards to a fully working visualisation to be implemented within the intended module of the staff partner.
Intended learning outcomes
By the end of this session, you will be able to:
- communicate your design and its justifications to both peers and external staff and students;
- reflect upon your learning during the module and the evolution of your relationship with your partners;
- decide whether you would like to stay a member of the ImpVis community and contribute to further visualisation designs or the development (programming phase) of visualisations.
Asynchronous work
- Complete the reflection tasks in your portfolio;
- Complete your self-assessment, based on your reflections and your personal learning goals;
- Submit portfolio & self-assessment by a pre-agreed deadline.
Congratulations, you have successfully completed the ImpVis module. We hope you enjoyed the journey and will be able to see your visualisation design in action in its intended module in the next academic year!


