Difference between revisions of "Managing your project on the ImpVis website"
| (6 intermediate revisions by the same user not shown) | |||
| Line 1: | Line 1: | ||
Once you have proposed or signed up to a project, you can manage your project via the '[https://impvis.co.uk/code/projects My Projects]' link in your '[https://impvis.co.uk/login MyVis]' portal on the website. | Once you have [[Getting involved|proposed or signed up to a project]], you can manage your project via the '[https://impvis.co.uk/code/projects My Projects]' link in your '[https://impvis.co.uk/login MyVis]' portal on the website. | ||
[[File:Manage project.png|alt=Screenshot of the project management environment|thumb|Fig 1: The project management environment]] | [[File:Manage project.png|alt=Screenshot of the project management environment|thumb|Fig 1: The project management environment]] | ||
| Line 10: | Line 10: | ||
== Advertising for project partners == | == Advertising for project partners == | ||
[[File:Open to collaborators.png|alt=Screenshot of the toggle to switch between open or closed to collaborators|thumb|Fig. 3: Open to collaborators toggle ]] | [[File:Open to collaborators.png|alt=Screenshot of the toggle to switch between open or closed to collaborators|thumb|Fig. 3: Open to collaborators toggle ]] | ||
When you create a new project, by default it will be set to 'Open to collaborators' (see figure 3). This means that your project will be listed on the '[https://impvis.co.uk/code Code]' environment of the website under the '''Looking to get involved? The following projects are looking for collaborators''<nowiki/>' banner. An example is shown in figure 4 - note the 'Sign Up' button that any users logged on to the ImpVis site will see. If a student clicks the 'Sign Up' button, you will receive an email asking if they accept the user. Once a current project partner has accepted the request, the new user will become an equal project partner with all the same permissions to the project as the project proposer. Students may want to discuss the project with you first - if so they can click the 'enquire' link, which will present them with a form to fill out resulting in an email to you with their enquiry. | When you create a new project, by default it will be set to 'Open to collaborators' (see figure 3). This means that your project will be listed on the '[https://impvis.co.uk/code Code]' environment of the website under the '''Looking to get involved? The following projects are looking for collaborators''<nowiki/>' banner. An example is shown in figure 4 - note the 'Sign Up' button that any users logged on to the ImpVis site will see. If a student clicks the 'Sign Up' button, you will receive an email asking if they accept the user. Once a current project partner has accepted the request, the new user will receive an email to notify them and they become an equal project partner with all the same permissions to the project as the project proposer. Students may want to discuss the project with you first - if so they can click the 'enquire' link, which will present them with a form to fill out resulting in an email to you with their enquiry. | ||
You can view your project partners in the project management environment as shown in figure 1. Once you have recruited enough partners, click the 'Open to collaborators' toggle as shown in figures 1 and 3. You will notice the toggle now states 'Closed to collaborators'. On the '[https://impvis.co.uk/code Code]' environment of the website, the project is moved automatically from the ' | You can view your project partners in the project management environment as shown in figure 1. Once you have recruited enough partners, click the 'Open to collaborators' toggle as shown in figures 1 and 3. You will notice the toggle now states 'Closed to collaborators'. On the '[https://impvis.co.uk/code Code]' environment of the website, the project is moved automatically from the '''Looking to get involved? The following projects are looking for collaborators''<nowiki/>' to the '<nowiki/>''Our work in progress - The following visualisations are currently in the design or development stage''<nowiki/>' section lower down on the page. Students can no longer sign up to the project, although they can still click the 'enquire' link. | ||
At any time during your project, you can switch the 'Closed to collaborators' toggle back to 'Open to collaborators' and vice versa to open or close advertisement for new project partners. | At any time during your project, you can switch the 'Closed to collaborators' toggle back to 'Open to collaborators' and vice versa to open or close advertisement for new project partners. | ||
[[File:Sign up.png|alt=Screenshot of the project advertisement card on the 'Code' environment of the website.|thumb|Fig 4: project advertisement on the 'Code' environment of the website.]] | |||
=== Manually adding or deleting project partners === | |||
Occasionally you may want to manually add project partners to your project, or delete inactive partners. Please use this functionality with caution and in communication with the partner you are about to delete or add! | |||
To delete a project partner, click the red cross next to their name. Note: they will be notified of this deletion by email, and can 'undo' the deletion by clicking the relevant link in that email within 7 days. | |||
To add a project partner, select a user from the 'Add partner' dropdown list. Note that only users that are currently signed up to the ImpVis website will appear here. When you click the 'Add' button, the new partner will receive the same email as they had requested to sign up and are now accepted onto the project. To avoid confusion, make sure you the new partner is expecting to become part of the project team![[File:Sign up.png|alt=Screenshot of the project advertisement card on the 'Code' environment of the website.|thumb|Fig 4: project advertisement on the 'Code' environment of the website.]] | |||
== Changing the progress status of your project == | == Changing the progress status of your project == | ||
| Line 26: | Line 32: | ||
Similarly, for projects that are not looking for collaborators the banner will state either 'Work in progress: design' or 'Work in progress: development'. | Similarly, for projects that are not looking for collaborators the banner will state either 'Work in progress: design' or 'Work in progress: development'. | ||
[[File:Progress status.png|alt=Screenshot of the progress status section in the project management environment|thumb|Fig 5: progress status section in the project management environment.]] | [[File:Progress status.png|alt=Screenshot of the progress status section in the project management environment|thumb|Fig 5: progress status section in the project management environment.]] | ||
Once all the functionality of the original visualisation design has been coded up, it can be uploaded to the website. This means the project will be closed. It is now treated as a visualisation and is ready for review - once formally approved it will appear on the 'Teach' environment of the website. | Once all the functionality of the original visualisation design has been coded up, it can be [[Uploading a new visualisation|uploaded]] to the website. This means the project will be closed. It is now treated as a visualisation and is ready for review - once formally approved it will appear on the 'Teach' environment of the website. | ||
== What's next? == | |||
* [[Uploading a new visualisation]] | |||
* The [[review]] process | |||
__FORCETOC__ | __FORCETOC__ | ||
[[Category:Getting Started]] | |||
[[Category:ImpVis Website Guidance]] | |||
Latest revision as of 09:17, 4 October 2021
Once you have proposed or signed up to a project, you can manage your project via the 'My Projects' link in your 'MyVis' portal on the website.
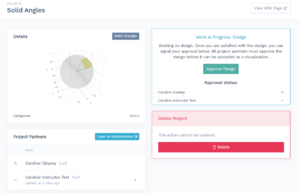
When you click on your project, you will be presented with a project management environment as shown in the screenshot to the right. This allows you to amend your project details, open or close your project for new collaborators, view current project partners, change the progress status of your project, or delete your project altogether (this cannot be undone).
Amending your project details
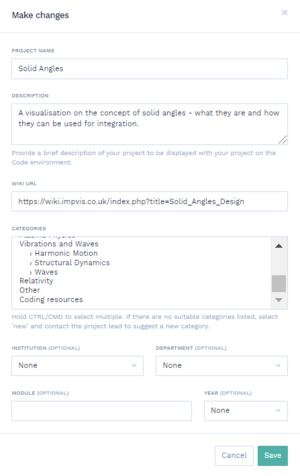
The 'Make Changes' button allows you to amend the title of your project, the description, its topic category and insert or alter the URL to the project's own Wiki page. You can also specify the institution, department, module and year group for which your visualisation is intended. This is shown in figure 2.
Advertising for project partners
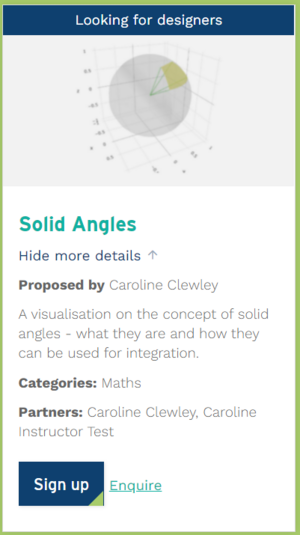
When you create a new project, by default it will be set to 'Open to collaborators' (see figure 3). This means that your project will be listed on the 'Code' environment of the website under the 'Looking to get involved? The following projects are looking for collaborators' banner. An example is shown in figure 4 - note the 'Sign Up' button that any users logged on to the ImpVis site will see. If a student clicks the 'Sign Up' button, you will receive an email asking if they accept the user. Once a current project partner has accepted the request, the new user will receive an email to notify them and they become an equal project partner with all the same permissions to the project as the project proposer. Students may want to discuss the project with you first - if so they can click the 'enquire' link, which will present them with a form to fill out resulting in an email to you with their enquiry.
You can view your project partners in the project management environment as shown in figure 1. Once you have recruited enough partners, click the 'Open to collaborators' toggle as shown in figures 1 and 3. You will notice the toggle now states 'Closed to collaborators'. On the 'Code' environment of the website, the project is moved automatically from the 'Looking to get involved? The following projects are looking for collaborators' to the 'Our work in progress - The following visualisations are currently in the design or development stage' section lower down on the page. Students can no longer sign up to the project, although they can still click the 'enquire' link.
At any time during your project, you can switch the 'Closed to collaborators' toggle back to 'Open to collaborators' and vice versa to open or close advertisement for new project partners.
Manually adding or deleting project partners
Occasionally you may want to manually add project partners to your project, or delete inactive partners. Please use this functionality with caution and in communication with the partner you are about to delete or add!
To delete a project partner, click the red cross next to their name. Note: they will be notified of this deletion by email, and can 'undo' the deletion by clicking the relevant link in that email within 7 days.
To add a project partner, select a user from the 'Add partner' dropdown list. Note that only users that are currently signed up to the ImpVis website will appear here. When you click the 'Add' button, the new partner will receive the same email as they had requested to sign up and are now accepted onto the project. To avoid confusion, make sure you the new partner is expecting to become part of the project team!
Changing the progress status of your project
When you first create a project, by default its progress status is set to the design phase (see figure 1 top right: 'Work in progress - design').
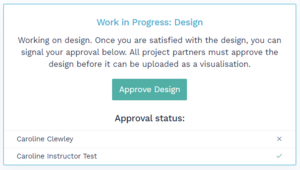
Once you have finalised your design and documented this on the visualisation's Wiki page, you can click the button 'Approve design' (see figure 5). Under the button you can see the approval status of all partners: those that have approved the design will have a tick mark next to their name. Once all partners have approved the design, the project's progress status will change to 'Work in progress - development'.
On the 'Code' environment on the ImpVis website, projects in the design phase looking for collaborators will have a banner stating 'Looking for designers' (see figure 4). For those that are in the development phase this banner will state 'Looking for developers'.
Similarly, for projects that are not looking for collaborators the banner will state either 'Work in progress: design' or 'Work in progress: development'.
Once all the functionality of the original visualisation design has been coded up, it can be uploaded to the website. This means the project will be closed. It is now treated as a visualisation and is ready for review - once formally approved it will appear on the 'Teach' environment of the website.
What's next?
- Uploading a new visualisation
- The review process


