Difference between revisions of "Three.js"
(edit 1) |
(Final edit) |
||
| (2 intermediate revisions by the same user not shown) | |||
| Line 11: | Line 11: | ||
'''Installation:''' | '''Installation:''' | ||
three.js can be installed by navigating to your project folder in your terminal and then typing: | three.js can be installed by navigating to your project folder in your terminal and then typing: | ||
<code>npm install three</code> | |||
Once installed, import it into your JavaScript file: | |||
[[File:Import threejs.png|thumb|Import three.js]] | |||
<code>import * as THREE from "../node_modules/three/build/three.module.js"</code> | |||
'''Orbit Controls:''' | |||
'''Orbit Controls:''' | |||
The Orbit Controls package must also be imported – this allows you to interact with (e.g. rotate, pan, zoom in/out) your 3D object. To import this into your JavaScript file: | |||
[[File:Import OrbitControls.png|thumb|Import OrbitControls]] | |||
<code>import {OrbitControls} from "../vendor_mods/three/examples/jsm/controls/OrbitControls.js"</code> | |||
'''Scene''' | |||
First, we construct the ‘Scene’ which can be thought of as the canvas for the 3D object. To create the Scene: | |||
<code>const scene = new THREE.Scene()</code> | |||
The position of the scene can be adjust using CSS. | |||
'''Camera''' | |||
The Camera controls how the user views the 3D object on the scene. There are lots of different types of cameras but generally the ‘PerspectiveCamera’ is used where objects further away appear smaller just how the human eye sees things. | |||
<code>const camera = new THREE.PerspectiveCamera()</code> | |||
PerspectiveCamera takes several variables in which one can define the type of lens (wide-angle, telephoto) and the aspect ratio. If we want the Scene to cover the entire page, the aspect ratio is window.innerWidth/window.innerHeight. | |||
The position of the Camera can be changed by setting the x, y and z positions: | |||
<code>camera.position.x = (enter float)</code> | |||
<code>camera.position.y = (enter float)</code> | |||
<code>camera.position.z = (enter float)</code> | |||
We must finally add the Camera to the Scene: | |||
<code>scene.add(camera)</code> | |||
'''Renderer''' | |||
Next we need the Renderer which can be thought of as taking a photo of the Scene through the perspective of the Camera. There are many types of Renderers, but the most common type is WebGLRenderer: | |||
<code>const renderer = new THREE.WebGLRenderer()</code> | |||
We would like the Renderer to fill the whole page: | |||
<code>renderer.setSize(window.innerWidth, window.innerHeight)</code> | |||
We then add: | |||
<code>document.body.append(renderer.domElement)</code> | |||
Finally add: | |||
<code>renderer.render(scene, camera)</code> | |||
'''Controls''' | |||
To enable Orbit Controls and allow interaction with the objects in your Scene: | |||
<code>var controls = new OrbitControls(camera, renderer.domElement)</code> | |||
To change the focal point of the controls: | |||
<code>controls.target.set(x, y, z )</code> | |||
where x, y and z specify the position of the focal point. | |||
To disable panning: | |||
<code>controls.enablePan = false</code> | |||
To set the maximum angle at which you want to rotate about to, say 30 radians: | |||
<code>controls.maxPolarAngle = 30</code> | |||
'''Mesh''' | |||
To add the 3D object, we use ‘Mesh’. The Mesh is made up of two variables: the geometry (the shape of the object) and the material (how the geometry looks). Let us take the example of a sphere. | |||
''Geometry:'' | |||
<code>const geometry_sphere = new THREE.SphereGeometry(1,100,100)</code> | |||
where the first input specifies the radius of the sphere, the second and third inputs specify the number of horizontal and vertical segments the sphere is divided into respectively (increasing the number results in a smoother sphere). | |||
''Material:'' | |||
<code>const material_sphere = new THREE.MeshLambertMaterial({color: 0xB9F4FF,transparent:true, opacity:0.5})</code> | |||
where the input ‘color’ specifies the color of the material of the sphere whilst the ‘transparent’ and ‘opacity’ inputs specify the transparency of the material of the sphere (the ‘transparent’ variable must be set to true before specifying the opacity value). | |||
Defining the sphere as an object which takes ‘geometry_sphere' as the geometry variable and ‘material_sphere’ as the material variable: | |||
<code>const sphere = new THREE.Mesh(geometry_sphere, material_sphere)</code> | |||
Finally add the sphere to the Scene: | |||
<code>scene.add(sphere)</code> | |||
'''Vectors''' | |||
Vectors can be implemented in the following way: | |||
Define variable: | |||
<code>const vector = new THREE.Vector3(1, 0, 0)</code> | |||
where the inputs specify the x, y, and z values of the vector respectively. | |||
To display the vector as an arrow, we define an arrow with the direction of the defined vector. Before that, we must define the origin at which we want the vector to start. We define this origin, say at the position (0, 0, 0), as a vector: | |||
<code>const origin – new THREE.Vector3(0,0,0)</code> | |||
We define the arrow: | |||
<code>const vector_display = new THREE.ArrowHelper(vector, origin, 1, 0xffff00)</code> | |||
where the inputs specify the direction, starting point, magnitude and color of the arrow respectively. | |||
Finally, add the vector to the scene: | |||
<code>scene.add(vector_display)</code> | |||
To rotate ‘vector’: | |||
<code>const vector_rotated = vector.applyaxisangle(axis, angle)</code> | |||
where the first input ‘axis’ refers to the axis about which the vector is to be rotated, and the second input ‘angle’ refers to the angle of rotation. | |||
'''Coordinate axes''' | |||
To add coordinate axes: | |||
<code>const axes = new THREE.AxesHelper(1)</code> | |||
where the input ‘1’ specifies the size of the coordinates axes. | |||
[[File:Content screenshot part 1.png|thumb|Content screenshot part 1]] | |||
[[File:Content screenshot part 2.png|thumb|Content screenshot part 2]] | |||
Finally, add the axes to the scene: | |||
[[File:Content screenshot part 3.png|thumb|Content screenshot part 3]] | |||
[[File:Content screenshot part 4.png|thumb|Content screenshot part 4]] | |||
<code>scene.add(axes)</code> | |||
'''Screenshot of three.js visualisation and content (see images):''' | |||
'''Things to work on in future:''' | |||
* Integration with the ImpVis template: Found it difficult to use import three.js into the template | |||
* Removing the previous vectors each time the user wants to define and interact with a new state | |||
* [[File:Template screenshot.png|thumb|Template screenshot]]Text on sphere to show the basis states (Pauli-x, Pauli-y and Pauli-z eigenstates) | |||
* Explanations (see pdf) | |||
'''Resources and links''' | |||
* ''Guidance on the official three.js website:'' https://threejs.org/manual/#en/fundamentals | |||
* ''Three.js coding tutorial: how to enhance a website by adding a 3D element? ft Bruno Simon - Prismic:'' https://www.youtube.com/watch?v=tVr89249gwM | |||
* ''Three.JS Orbit Controls: Zoom, Pan, Rotate - SyntaxByte:'' https://www.youtube.com/watch?v=4ZgkMS5rH3E | |||
* ''Three.js Crash Course for Absolute Beginners – DesignCourse:'' https://www.youtube.com/watch?v=6oFvqLfRnsU | |||
* ''Getting Started With Your First three.js Project: Part 1 - The Setup:'' https://medium.com/nerd-for-tech/getting-started-with-your-first-three-js-project-part-one-the-setup-17f18660aecc | |||
* ''Getting Started With Your First three.js Project: Part 2 - The Build:'' https://medium.com/nerd-for-tech/getting-started-with-your-first-three-js-project-part-two-the-build-3fd9a2f21418 | |||
[[Category:Records]] | [[Category:Records]] | ||
[[Category:Summer 2022]] | [[Category:Summer 2022]] | ||
Latest revision as of 00:37, 22 August 2022
Author - Sarmpavi
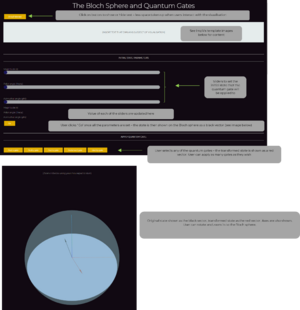
I developed an interactive visualisation using three.js on quantum gates and their effects on quantum states. This visualisation is intended for 3rd and 4th undergraduate Physics students taking the Quantum Information module. I also created a design template (with the learning outcomes) which can be found on the Miro page under Bloch Sphere. As I developed this visualisation, I documented what I had learnt about three.js and how it can be used to create visualisations. Below is a summary of what I have learnt.
Introduction
This guidance page provides some basic information on how to use three.js including example code (which can be found on ImpVis’ GitHub) and some useful resources to learn and gain more knowledge about the package. Please note that the example code has been written by myself with only a few weeks of three.js experience – a lot of improvements can be made (some of which I have listed below) but I hope this will be somewhat useful for any beginners who are reading this. This page also assumes that you have some basic JavaScript/HTML/CSS knowledge.
three.js is a library which allows you to create 3D content and is a useful tool when developing interactive visualisations.
Installation:
three.js can be installed by navigating to your project folder in your terminal and then typing:
npm install three
Once installed, import it into your JavaScript file:
import * as THREE from "../node_modules/three/build/three.module.js"
Orbit Controls:
Orbit Controls:
The Orbit Controls package must also be imported – this allows you to interact with (e.g. rotate, pan, zoom in/out) your 3D object. To import this into your JavaScript file:
import {OrbitControls} from "../vendor_mods/three/examples/jsm/controls/OrbitControls.js"
Scene
First, we construct the ‘Scene’ which can be thought of as the canvas for the 3D object. To create the Scene:
const scene = new THREE.Scene()
The position of the scene can be adjust using CSS.
Camera
The Camera controls how the user views the 3D object on the scene. There are lots of different types of cameras but generally the ‘PerspectiveCamera’ is used where objects further away appear smaller just how the human eye sees things.
const camera = new THREE.PerspectiveCamera()
PerspectiveCamera takes several variables in which one can define the type of lens (wide-angle, telephoto) and the aspect ratio. If we want the Scene to cover the entire page, the aspect ratio is window.innerWidth/window.innerHeight.
The position of the Camera can be changed by setting the x, y and z positions:
camera.position.x = (enter float)
camera.position.y = (enter float)
camera.position.z = (enter float)
We must finally add the Camera to the Scene:
scene.add(camera)
Renderer
Next we need the Renderer which can be thought of as taking a photo of the Scene through the perspective of the Camera. There are many types of Renderers, but the most common type is WebGLRenderer:
const renderer = new THREE.WebGLRenderer()
We would like the Renderer to fill the whole page:
renderer.setSize(window.innerWidth, window.innerHeight)
We then add:
document.body.append(renderer.domElement)
Finally add:
renderer.render(scene, camera)
Controls
To enable Orbit Controls and allow interaction with the objects in your Scene:
var controls = new OrbitControls(camera, renderer.domElement)
To change the focal point of the controls:
controls.target.set(x, y, z )
where x, y and z specify the position of the focal point.
To disable panning:
controls.enablePan = false
To set the maximum angle at which you want to rotate about to, say 30 radians:
controls.maxPolarAngle = 30
Mesh
To add the 3D object, we use ‘Mesh’. The Mesh is made up of two variables: the geometry (the shape of the object) and the material (how the geometry looks). Let us take the example of a sphere.
Geometry:
const geometry_sphere = new THREE.SphereGeometry(1,100,100)
where the first input specifies the radius of the sphere, the second and third inputs specify the number of horizontal and vertical segments the sphere is divided into respectively (increasing the number results in a smoother sphere).
Material:
const material_sphere = new THREE.MeshLambertMaterial({color: 0xB9F4FF,transparent:true, opacity:0.5})
where the input ‘color’ specifies the color of the material of the sphere whilst the ‘transparent’ and ‘opacity’ inputs specify the transparency of the material of the sphere (the ‘transparent’ variable must be set to true before specifying the opacity value).
Defining the sphere as an object which takes ‘geometry_sphere' as the geometry variable and ‘material_sphere’ as the material variable:
const sphere = new THREE.Mesh(geometry_sphere, material_sphere)
Finally add the sphere to the Scene:
scene.add(sphere)
Vectors
Vectors can be implemented in the following way:
Define variable:
const vector = new THREE.Vector3(1, 0, 0)
where the inputs specify the x, y, and z values of the vector respectively.
To display the vector as an arrow, we define an arrow with the direction of the defined vector. Before that, we must define the origin at which we want the vector to start. We define this origin, say at the position (0, 0, 0), as a vector:
const origin – new THREE.Vector3(0,0,0)
We define the arrow:
const vector_display = new THREE.ArrowHelper(vector, origin, 1, 0xffff00)
where the inputs specify the direction, starting point, magnitude and color of the arrow respectively.
Finally, add the vector to the scene:
scene.add(vector_display)
To rotate ‘vector’:
const vector_rotated = vector.applyaxisangle(axis, angle)
where the first input ‘axis’ refers to the axis about which the vector is to be rotated, and the second input ‘angle’ refers to the angle of rotation.
Coordinate axes
To add coordinate axes:
const axes = new THREE.AxesHelper(1)
where the input ‘1’ specifies the size of the coordinates axes.
Finally, add the axes to the scene:
scene.add(axes)
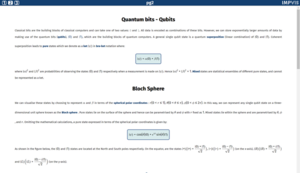
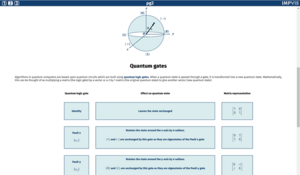
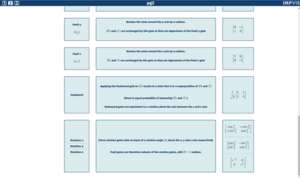
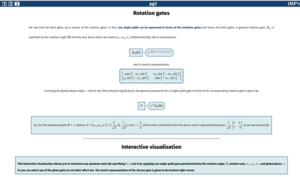
Screenshot of three.js visualisation and content (see images):
Things to work on in future:
- Integration with the ImpVis template: Found it difficult to use import three.js into the template
- Removing the previous vectors each time the user wants to define and interact with a new state
- Text on sphere to show the basis states (Pauli-x, Pauli-y and Pauli-z eigenstates)
- Explanations (see pdf)
Resources and links
- Guidance on the official three.js website: https://threejs.org/manual/#en/fundamentals
- Three.js coding tutorial: how to enhance a website by adding a 3D element? ft Bruno Simon - Prismic: https://www.youtube.com/watch?v=tVr89249gwM
- Three.JS Orbit Controls: Zoom, Pan, Rotate - SyntaxByte: https://www.youtube.com/watch?v=4ZgkMS5rH3E
- Three.js Crash Course for Absolute Beginners – DesignCourse: https://www.youtube.com/watch?v=6oFvqLfRnsU
- Getting Started With Your First three.js Project: Part 1 - The Setup: https://medium.com/nerd-for-tech/getting-started-with-your-first-three-js-project-part-one-the-setup-17f18660aecc
- Getting Started With Your First three.js Project: Part 2 - The Build: https://medium.com/nerd-for-tech/getting-started-with-your-first-three-js-project-part-two-the-build-3fd9a2f21418
